Tuesday, November 12, 2013

OS - Memory Management

OS - Memory Management


Memory management is the functionality of an operating system which handles or manages primary memory. Memory management keeps track of each and every memory location either it is allocated to some process or it is free. It checks how much memory is to be allocated to processes. It decides which process will get memory at what time. It tracks whenever some memory gets freed or unallocated and correspondingly it updates the status.
Memory management provides protection by using two registers, a base register and a limit register. The base register holds the smallest legal physical memory address and the limit register specifies the size of the range. For example, if the base register holds 300000 and the limit register is 1209000, then the program can legally access all addresses from 300000 through 411999.
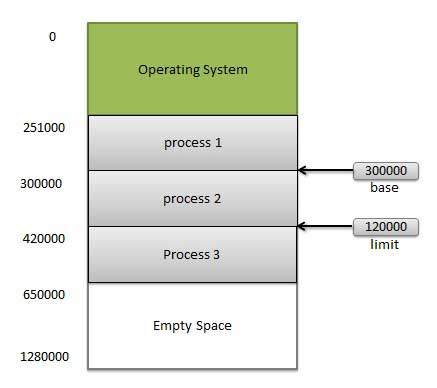
Memory Management
Instructions and data to memory addresses can be done in following ways
  • Compile time -- When it is known at compile time where the process will reside, compile time binding is used to generate the absolute code.
  • Load time -- When it is not known at compile time where the process will reside in memory, then the compiler generates re-locatable code.
  • Execution time -- If the process can be moved during its execution from one memory segment to another, then binding must be delayed to be done at run time

Dynamic Loading

In dynamic loading, a routine of a program is not loaded until it is called by the program. All routines are kept on disk in a re-locatable load format. The main program is loaded into memory and is executed. Other routines methods or modules are loaded on request. Dynamic loading makes better memory space utilization and unused routines are never loaded.

Dynamic Linking

Linking is the process of collecting and combining various modules of code and data into a executable file that can be loaded into memory and executed. Operating system can link system level libraries to a program. When it combines the libraries at load time, the linking is called static linking and when this linking is done at the time of execution, it is called as dynamic linking.
In static linking, libraries linked at compile time, so program code size becomes bigger whereas in dynamic linking libraries linked at execution time so program code size remains smaller.

Logical versus Physical Address Space

An address generated by the CPU is a logical address whereas address actually available on memory unit is a physical address. Logical address is also known a Virtual address.
Virtual and physical addresses are the same in compile-time and load-time address-binding schemes. Virtual and physical addresses differ in execution-time address-binding scheme.
The set of all logical addresses generated by a program is referred to as a logical address space. The set of all physical addresses corresponding to these logical addresses is referred to as a physical address space.
The run-time mapping from virtual to physical address is done by the memory management unit (MMU) which is a hardware device. MMU uses following mechanism to convert virtual address to physical address.
  • The value in the base register is added to every address generated by a user process which is treated as offset at the time it is sent to memory. For example, if the base register value is 10000, then an attempt by the user to use address location 100 will be dynamically reallocated to location 10100.
  • The user program deals with virtual addresses; it never sees the real physical addresses.

Swapping

Swapping is a mechanism in which a process can be swapped temporarily out of main memory to a backing store , and then brought back into memory for continued execution.
Backing store is a usually a hard disk drive or any other secondary storage which fast in access and large enough to accommodate copies of all memory images for all users. It must be capable of providing direct access to these memory images.
Major time consuming part of swapping is transfer time. Total transfer time is directly proportional to the amount of memory swapped. Let us assume that the user process is of size 100KB and the backing store is a standard hard disk with transfer rate of 1 MB per second. The actual transfer of the 100K process to or from memory will take
100KB / 1000KB per second
= 1/10 second
= 100 milliseconds
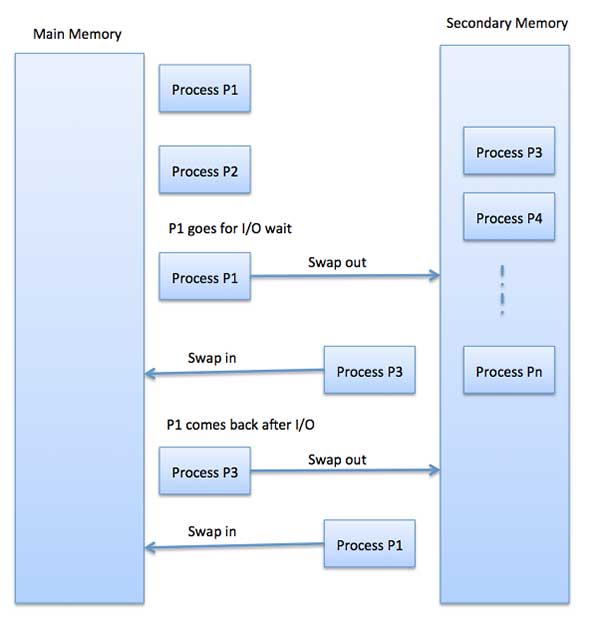
Process Swapping

Memory Allocation

Main memory usually has two partitions
  • Low Memory -- Operating system resides in this memory.
  • High Memory -- User processes then held in high memory.
Operating system uses the following memory allocation mechanism.
S.N.Memory AllocationDescription
1Single-partition allocationIn this type of allocation, relocation-register scheme is used to protect user processes from each other, and from changing operating-system code and data. Relocation register contains value of smallest physical address whereas limit register contains range of logical addresses. Each logical address must be less than the limit register.
2Multiple-partition allocationIn this type of allocation, main memory is divided into a number of fixed-sized partitions where each partition should contain only one process. When a partition is free, a process is selected from the input queue and is loaded into the free partition. When the process terminates, the partition becomes available for another process.

Fragmentation

As processes are loaded and removed from memory, the free memory space is broken into little pieces. It happens after sometimes that processes can not be allocated to memory blocks considering their small size and memory blocks remains unused. This problem is known as Fragmentation.
Fragmentation is of two types
S.N.FragmentationDescription
1External fragmentationTotal memory space is enough to satisfy a request or to reside a process in it, but it is not contiguous so it can not be used.
2Internal fragmentationMemory block assigned to process is bigger. Some portion of memory is left unused as it can not be used by another process.
External fragmentation can be reduced by compaction or shuffle memory contents to place all free memory together in one large block. To make compaction feasible, relocation should be dynamic.

Paging

External fragmentation is avoided by using paging technique. Paging is a technique in which physical memory is broken into blocks of the same size called pages (size is power of 2, between 512 bytes and 8192 bytes). When a process is to be executed, it's corresponding pages are loaded into any available memory frames.
Logical address space of a process can be non-contiguous and a process is allocated physical memory whenever the free memory frame is available. Operating system keeps track of all free frames. Operating system needs n free frames to run a program of size n pages.
Address generated by CPU is divided into
  • Page number (p) -- page number is used as an index into a page table which contains base address of each page in physical memory.
  • Page offset (d) -- page offset is combined with base address to define the physical memory address.
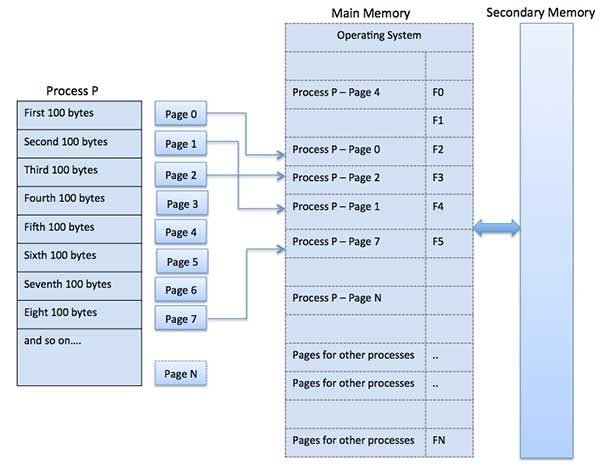
Paging
Following figure show the paging table architecture.
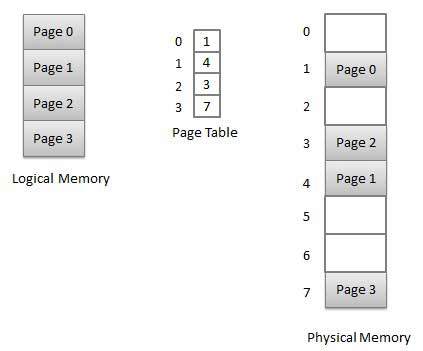
Paging Example

Segmentation

Segmentation is a technique to break memory into logical pieces where each piece represents a group of related information. For example ,data segments or code segment for each process, data segment for operating system and so on. Segmentation can be implemented using or without using paging.
Unlike paging, segment are having varying sizes and thus eliminates internal fragmentation. External fragmentation still exists but to lesser extent.
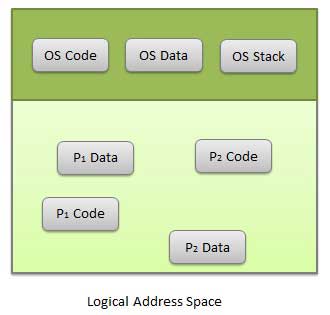
Logical Address Space
Address generated by CPU is divided into
  • Segment number (s) -- segment number is used as an index into a segment table which contains base address of each segment in physical memory and a limit of segment.
  • Segment offset (o) -- segment offset is first checked against limit and then is combined with base address to define the physical memory address.
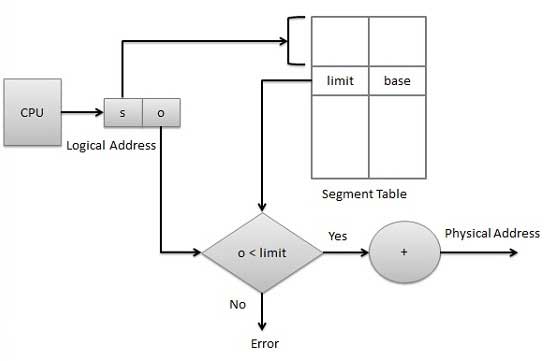
Segmentation Example

Monday, April 8, 2013

വിന്‍ഡോസ്‌ ലോഗിന്‍ പാസ്സ്‌വേര്‍ഡ്‌ എങ്ങനെ റീസെറ്റ്‌ ചെയ്യാം ?


വിന്‍ഡോസ്‌ ലോഗിന്‍ പാസ്സ്‌വേര്‍ഡ്‌ എങ്ങനെ റീസെറ്റ്‌ ചെയ്യാം ?

Decrease Font SizeIncrease Font SizeText SizePrint This Page
നമ്മുടെ വിന്‍ഡോസ് ലോഗിന്‍ പാസ്സ്‌വേര്‍ഡ് മറന്നുപോയാല്‍ എന്തുചെയ്യണം എന്നത് മിക്കവര്‍ക്കും ഉള്ള ഒരു സംശയമാണ്. മറന്നുപോയ ഒരു വിന്‍ഡോസ് ലോഗിന്‍ പാസ്സ്‌വേര്‍ഡ് എങ്ങനെ റീസെറ്റ് ചെയ്ത് കമ്പ്യൂട്ടര്‍ വീണ്ടും പഴയതുപോലെ ഉപയോഗിക്കാന്‍ ഉള്ള ചില മാര്‍ഗങ്ങള്‍ ആണ് ഈ പോസ്റ്റില്‍ പറയുന്നത്.
ആദ്യം നമുക്ക് നഷ്ടപ്പെട്ടത് അഡ്മിന്‍ പാസ്സ്‌വേര്‍ഡ് ആണെങ്കില്‍ എന്തുചെയ്യാം എന്ന് നോക്കാം.
1.ഓഫ്ക്രാക്ക് ഓഫ്ക്രാക്ക് എന്ന സോഫ്റ്റ്‌വെയര്‍ ഉപയോഗിച്ച് നഷ്ട്ടപ്പെട്ട പാസ്സ്‌വേര്‍ഡ് കള്‍ ക്രാക്ക് ചെയ്യാന്‍ സാധിക്കും. ഈ സോഫ്റ്റ്‌വെയര്‍ ഈ വെബ്‌സൈറ്റില്‍ നിന്ന് സൗജന്യമായി ഡൌണ്‍ലോഡ് ചെയ്യാന്‍ സാധിക്കും. ഇത് വിന്‍ഡോസ് സെവെന്‍, വിസ്റ്റ, എക്‌സ് പി എന്നിവയില്‍ ഉപയോഗിക്കാവുന്നതാണ്. ഇത് ഉപയോഗിക്കുന്നതിനുമുന്‍പ് ‘റെയിന്‍ബോ ടേബിള്‍ ‘ എന്ന ഒരു ടേബിള്‍ ഇന്‍സ്‌റ്റോള്‍ ചെയ്യേണ്ടതുണ്ട്. കണ്ടുപിടിക്കേണ്ട പാസ്സ്‌വേര്‍ഡ് അനുസരിച്ച് വിവിധ റെയിന്‍ബോ ടേബിളുകള്‍ ഇവിടെ നിന്ന് ഡൌണ്‍ലോഡ് ചെയ്യാവുന്നതാണ്.ഈ സോഫ്റ്റ്‌വെയര്‍ ഒരു സി ഡി യിലേക്ക്പകര്‍ത്തി, ആ സി ഡി യില്‍ നിന്ന് ബൂട്ട് ചെയ്ത് ഇത് ഉപയോഗിക്കാം.
2.Offline NT Password & Registry Editor ഉപയോഗിച്ചും നമുക്ക് വിന്‍ഡോസ് പാസ്സ്‌വേര്‍ഡ് റീസെറ്റ് ചെയ്യാം. ഈ ലിങ്കില്‍ നിന്ന് സോഫ്റ്റ്‌വെയര്‍ ഡൌണ്‍ലോഡ് ചെയ്യാവുന്നതാണ്. ഡൌണ്‍ലോഡ് ചെയ്തതിനുശേഷം ഈ സോഫ്റ്റ്‌വെയര്‍ ഒരു സി ഡി യിലേക്ക്പകര്‍ത്തി, ആ സി ഡി യില്‍ നിന്ന് ബൂട്ട് ചെയ്ത് ഇത് ഉപയോഗിക്കാം. ഈ സോഫ്റ്റ്‌വെയര്‍ ഉപയോഗിച്ചാല്‍ പിന്നെ നമുക്ക് പാസ്സ്‌വേര്‍ഡ് ഇല്ലാതെ തന്നെ ലോഗിന്‍ ചെയ്യാവുന്നതാണ്, കാരണം നമ്മള്‍ സി ഡി യില്‍ നിന്ന് ബൂട്ട് ചെയ്യുമ്പോള്‍ ആ പാസ്സ്‌വേര്‍ഡ് ഡിലീറ്റ് ചെയ്യുകയാണ് ചെയ്യുന്നത്. ഈ രീതി വിന്‍ഡോസ് സെവെന്‍, വിസ്റ്റ, എന്‍ ടി, 2000 എന്നിവയില്‍ ഉപയോഗിക്കാവുന്നതാണ്.
3.PC Login Now-ഇതും മുകളില്‍ പറഞ്ഞതുപോലെ ഒരു സി ഡി യിലേക്ക്പകര്‍ത്തി, ആ സി ഡി യില്‍ നിന്ന് ബൂട്ട് ചെയ്ത് ഇത് ഉപയോഗിക്കാം. ഈ സോഫ്റ്റ്‌വെയര്‍ ഉപയോഗിച്ചാല്‍ പിന്നെ നമുക്ക് പാസ്സ്‌വേര്‍ഡ് ഇല്ലാതെ തന്നെ ലോഗിന്‍ ചെയ്യാവുന്നതാണ്, കാരണം നമ്മള്‍ സിഡി യില്‍ നിന്ന് ബൂട്ട് ചെയ്യുമ്പോള്‍ ആ പാസ്സ്‌വേര്‍ഡ് ഡിലീറ്റ് ചെയ്യുകയാണ് ചെയ്യുന്നത്. ഈ രീതി വിന്‍ഡോസ് സെവെന്‍, വിസ്റ്റ, എക്‌സ് പി എന്നിവയില്‍ ഉപയോഗിക്കാവുന്നതാണ്. ഈ ലിങ്കില്‍ നിന്ന് സോഫ്റ്റ്‌വെയര്‍ ഡൌണ്‍ലോഡ് ചെയ്യാവുന്നതാണ്.
4.വിന്‍ഡോസ് പാസ്‌വേഡ് റീസെറ്റ് ഡിസ്‌ക് നിങ്ങള്‍ക്ക് ഒരു വിന്‍ഡോസ് പാസ്‌വേഡ് റീസെറ്റ് ഡിസ്‌ക് ഉണ്ടെങ്കില്‍ താഴെ പറയുന്നതുപോലെ ചെയ്യുക.
  • ആദ്യം വിന്‍ഡോസ് പാസ്‌വേഡ് റീസെറ്റ് ഡിസ്‌ക് ഉപയോഗിച്ച് കമ്പ്യൂട്ടര്‍ ബൂട്ട് ചെയ്യുക.
  • നിങ്ങളുടെ യുസര്‍ നെയിം തിരഞ്ഞെടുത്ത് എന്റര്‍ അമര്‍ത്തുക.
  • ഒരു എറര്‍ മെസ്സേജ് വന്നാല്‍ ഓക്കേ അമര്‍ത്തുക.
  • പാസ്സ്‌വേര്‍ഡ് ബോക്‌സ് ന്റെ താഴെ ഉള്ള Reset Password എന്ന ബട്ടണ്‍ അമര്‍ത്തുക.
  • ഇനി വരുന്ന നിര്‍ദേശങ്ങള്‍ അനുസരിച്ച്പുതിയ പാസ്സ്‌വേര്‍ഡ് കൊടുക്കുക.
  • പുതിയ പാസ്സ്‌വേര്‍ഡ് ഉപയോഗിച്ച് ലോഗിന്‍ ചെയ്യുക.
ഇനി നഷ്ടപ്പെട്ടത് അഡ്മിന്‍ പാസ്സ്‌വേര്‍ഡ് അല്ലെങ്കില്‍ നമുക്ക് എന്തുചെയ്യാം എന്ന് നോക്കാം.
1.lusrmgr.msc ഉപയോഗിക്കാം
  • ആദ്യം സ്റ്റാര്‍ട്ട് ബട്ടണ്‍ ക്ലിക്ക് ചെയ്തു സെര്‍ച്ച് ബോക്‌സില്‍ lusrmgr.msc എന്ന് ടൈപ്പ് ചെയ്തു ആ ഫയല്‍ ഓപ്പണ്‍ ചെയ്യുക.
  • അതില്‍ യുസേഴ്‌സ് തിരഞ്ഞെടുക്കുക.
  • പാസ്സ്‌വേര്‍ഡ് മാറ്റേണ്ട യുസര്‍നെയിം റൈറ്റ് ക്ലിക്ക് ചെയ്ത് റീസെറ്റ് പാസ്സ്‌വേര്‍ഡ് തിരഞ്ഞെടുക്കുക.
  • പുതിയ പാസ്സ്‌വേര്‍ഡ് കൊടുക്കുക.
2.command promptല്‍ നിന്ന് പാസ്സ്‌വേര്‍ഡ് മാറ്റാം.
ആദ്യം സ്റ്റാര്‍ട്ട് ബട്ടണ്‍ ക്ലിക്ക് ചെയ്തു സെര്‍ച്ച് ബോക്‌സില്‍ cmd എന്ന് ടൈപ്പ് ചെയ്തു ആ ഫയല്‍ ഓപ്പണ്‍ ചെയ്യുക.അവിടെ net user melbin newpass എന്ന് ടൈപ്പ് ചെയ്യുക. (ഇവിടെ melbin എന്നത് യുസര്‍നെയിമും newpass എന്നത് പുതിയ പാസ്സ്‌വേര്‍ഡും ആണ്).
ഈ പോസ്റ്റ് നിങ്ങള്‍ക്ക് ഇഷ്ടപ്പെട്ടു എന്ന് കരുതുന്നു. ദയവായി നിങ്ങളുടെ അഭിപ്രായങ്ങള്‍ താഴെ എഴുതുക.


Read & Share on Ur Facebook Profile: http://boolokam.com/archives/51436#ixzz2PqaZrRhr

Friday, February 22, 2013

Google Products


Google Products


Below is an update list of available products and services available from Google.
  • Developer
    • Code: Developer tools, APIs and resources
  • Mobile
    • Mobile: Get Google products on your mobile phone
  • Productivity
    • Calendar: Organize your schedule and share events with friends
    • Google Drive: Create and share your online documents, presentations and spreadsheets
    • Google Mail: Fast, searchable email with less spam
    • Reader: Get all your blogs and news feeds fast
  • Search
    • Blog Search: Find blogs on your favorite topics
    • Books: Search the full text of books
    • Finance: Business info, news and interactive charts
    • Flights: Try searching for best deals on available flights
    • Groups: Create mailing lists and discussion groups
    • iGoogle: Add news, games and more to your Google homepage
      • Will be discontinued after 11/1/2013
    • Images: Search for images on the web
    • Maps: View maps and directions
    • News: Search thousands of news stories
    • Patent Search: Search the full text of US Patents
    • Product Search: Search for stuff to buy
    • Recipes: shows recipes with ingredients, cook time and calorie count.
    • Scholar: Search scholarly papers
    • Videos: Search for videos on the web
    • Web Search: Search billions of web pages
  • Service
    • Alerts: Get email updates on the topics of your choice
    • Wallet: Complete online purchases more quickly and securely
    • Places: Search places and businesses using Google+
    • Play: Google content (books, magazines, music, and more) marketplace.
    • Public Data: Search demographic data
    • Translate: View web pages in other languages
    • Trends: Explore past and present search trends
    • Voice: One number for all your phones, online voice mail and cheap calling
    • YouTube: Watch, upload and share videos
  • Software
    • Earth: Explore the world from your computer
    • Google Chrome: A browser built for speed, stability and security
    • Picasa: Find, edit and share your photos
    • SketchUp: Build 3D models quickly and easily
    • Talk: IM and call your friends through your computer
    • Toolbar: Add a search box to your browser (only for Internet Explorer)
  • Web Site
    • Blogger: Share your life online with a blog
    • Sites: Create websites and secure group wikis
Related Articles:

Windows 8: Windows Key Keyboard Shortcuts


Windows 8: Windows Key Keyboard Shortcuts


With every new version of it operating system, Microsoft updates the keyboard shortcuts.  Sometimes it changes the functionality of older shortcuts, and it also adds new shortcuts as appropriate. 

The Windows Key (WinKey) keyboard shortcuts below are for Windows 8

Key StrokesDescription
WinKeyDisplays the Start screen.
WinKey + Pause/BreakDisplays System Properties page.
WinKey + DDisplays the Desktop from the Start screen.
WinKey + EDisplays Windows Explorer.
WinKey + FDisplays Search for files and folder.
WinKey + F1Displays Help and Support Center.
WinKey + LLock the workstation.
WinKey + M Minimizes all of the windows on the desktop*.
WinKey + RDisplays Run dialog box.
WinKey + Tab Lists the currently running applications.
WinKey+ PrtScrnTakes a screenshot and saves it in the Screenshots folder under the Pictures folder. Note: On a Windows 8 tablet to take a screenshot, press the Windows button and the volume-down button simultaneously on the tablet chassis.
WinKey + QDisplays the Global Search menu.
WinKey + WDisplays the System Settings menu.    
WinKey + , (comma)Makes all windows transparent.
WinKey + . (period)Toggles the current window to the right or left side.
WinKey + XDisplays the Quick Access menu. Note: Similar to right-clicking on the bottom right corner of the screen to view the Quick Access Menu.
WinKey + IDisplays the Settings menu.
WinKey + OLocks the orientation for devices with an accelerometer.

To find more application shortcut keys for Windows, Internet Explorer, Remote Desktop and several more, check out my Application Keyboard Shortcuts page.

Thursday, February 21, 2013

How to lock any file or folder without any software


How to lock any file or folder without any software


Most of us have private data. Not all of us have a private computer to keep that data. So, we just end up with other people viewing that data. Although password protecting software do work, it is almost useless to hide private data with these software(because we are always questioned as to what it is that we are hiding with the help of these software). 


Hidden folders do not work as they can be easily searched with Windows Search. So, we need an alternative way to create hidden password protected folders which only we can access. And that is exactly what we will learn in this post.

With this trick, you can create a secure password protected folder in Windows which no one except you can access. To use this trick, follow the instructions given below:-

  • 1.  Open Notepad.
  • 2.  Copy and paste the exact code given below:-


cls
@ECHO OFF
title computer-tricks-corner.blogspot.com
if EXIST "Control Panel.{21EC2020-3AEA-1069-A2DD-08002B30309D}" goto UNLOCK
if NOT EXIST MyFolder goto MDMyFolder
:CONFIRM
echo Are you sure to lock this folder? (Y/N)
set/p "cho=>"
if %cho%==Y goto LOCK
if %cho%==y goto LOCK
if %cho%==n goto END
if %cho%==N goto END
echo Invalid choice.
goto CONFIRM
:LOCK
ren MyFolder "Control Panel.{21EC2020-3AEA-1069-A2DD-08002B30309D}"
attrib +h +s "Control Panel.{21EC2020-3AEA-1069-A2DD-08002B30309D}"
echo Folder locked
goto End
:UNLOCK
echo Enter password to Unlock Your Secure Folder
set/p "pass=>"
if NOT %pass%== suneeshpm.blogspot.com goto FAIL
attrib -h -s "Control Panel.{21EC2020-3AEA-1069-A2DD-08002B30309D}"
ren "Control Panel.{21EC2020-3AEA-1069-A2DD-08002B30309D}" MyFolder
echo Folder Unlocked successfully
goto End
:FAIL
echo Invalid password
goto end
:MDMyFolder
md MyFolder
echo MyFolder created successfully
goto End
:End
  • 3.  Click on the File Menu. Click on Save As.
  • 4.  Select All Types (or all files) in the Save As Type dropdown menu. Save the file as *.bat or Locker.bat 
After creating the file, double click on the Saved file. A new folder will be created. Enter your data in the folder. Again, double click on the batch file. Type Y and press Enter. The folder will be hidden from view.
To re-view your folder, double click on the saved batch file. Enter password as 
" computer-tricks-corner.blogspot.com " without quotes ("") and press Enter key. This is also the default password. Your folder will be visible again.

To change the default password, edit the part of the code given in blue and enter your own password.
 

The overall usability of this trick can be improved by deleting the batch file after hiding your folder and re-creating it when you wish to access your folder again.
 

If you face any problem using this trick, you can write a comment and I will do my best to help you.
 

Note
 : This works on Windows 7, Windows XP and Vista. First try this on useless data to be sure and then only hide your personal data. 

Translate